Showing posts with label Looks. Show all posts

Saturday, 14 September 2013

Natural Makeup

Occasionally, I like to go more natural with my makeup...but only occasionally lol  I almost always have a full face of foundation on, but sometimes I opt for just mascara and a natural lip.  Now, whether that is because I run out of time doing my makeup in the morning, because I'm just too lazy, or because I actually decide to do it, is for me to know and you to find out ;)  Today I went on the more natural side with a cheeky blush application, natural lip balm, and mascara only on the top lashes with a liiiittle white eyeliner on my lower waterline.

I'm starting to get a little better with my brows, but you can see they're not QUITE even and a little misshapen at the ends...BUT I've come a long way and I'm happy with them :)  I think I need to invest in a brow pencil to sharpen them up a little bit, but that's for another day!  Let me know what you guys think of this natural, "no makeup" makeup look!  Stay beautiful, lovelies!

Make-Up, not War,

Rain xoxo


Thursday, 12 September 2013

Contouring/Face Sculpting

So, I am trying to get a little more into face sculpting/contouring with cream products.  I picked up a contouring wheel from Lise Watier a couple of days ago and decided to test it out this morning.  Normally I just contour with powder products like my bronzer, blush, and highlight.  It works well for the darker applications I think, but for some reason powder highlight just doesn't do it for me...I don't get that bright, creamy look I always want.  This morning I spent a little extra time on my face applying product, but I am happy with the results.  I need a little more practice I think and I need to get a proper blending brush (right now I am using my Beauty Blender), but I got that sculpted look I was after.  However, I think the pictures turned out a little better than what I think it looks like in real life...in the mirror I almost feel like I just have dirty face?  Maybe it's just because I am not used to how sculpted it looks or maybe I need to blend a little more?  I will keep practicing and once I have it down, I'll do a pictorial!  I think it might be that I need to wet the Lise Watier cream before applying it because it is quite thick and I might need to dampen my sponge a little more for blending.  Overall though, I'm pretty satisfied with how it turned out :)


 When I picked up the contouring wheel from Shopper's Drugmart, I also picked up a Quo eye pencil in this gorgeous shimmery green...I just couldn't resist it!  Lise Watier also has a correcting wheel that comes with a lilac and a green portion, but I really wanted the dark colour for contouring.  I might pick up the correcting wheel another time though :)


I applied foundation first and concealed under my eyes and fixed any blemishes before I applied the highlight and contour with a concealer brush.  I then blended the products out and together with a damp Beauty Blender.  In hindsight, I think it needed to be just a liiiiittle more wet, but I still like the results :)  I've always loved that high, sculpted cheekbone look, but powder just wasn't giving me the results I wanted...with a little more practice, I think this just might become a staple in my routine!

I'd really love to hear feedback from you guys on how you think this turned out?  I'm not very impartial when it comes to my own face :p  Also would make me super happy to see comments on what you guys want to see or any questions you might have?  Let me know!  Stay beautiful <3

Make-Up, not War,

Rain xoxo

Wednesday, 11 September 2013

Desperately Holding onto Summer

So I know that I did a Fall look a couple of posts back, but I am definitely going to miss all the bright colours of Spring and Summer :(  So, to celebrate the awesome Summer we've had, here's a bright and vibrant look!


Purple and vibrant pink look with Marc Jacobs Lip Lacquer in Boom Boom


This lip gloss is amazeballs.  It is SUPER pigmented and lasts for hours, which is surprising for a gloss, but it's not really sticky, which I love!


I used the "tape trick" to get the harsh line and I also used NYX Jumbo Eyeshadow Pencil - Milk to get the colour to really show through.  Eyeshadows are Sleek Acid Palette and Sephora Collection.


Just something quick and fun for you guys to check out.  I had a request on reddit to do a pictorial for this look, so when I do, I will post it here as well in case anyone is interested :)  Please leave a comment if you have anything to say, questions, or suggestions!  Love to hear from you :)

Make-Up, not War,

Rain xoxo

Tuesday, 10 September 2013

Lashes, Lashes, Lashes

I have been debating trying false lashes for a long time now.  I have tried them before, but I've never really been happy with the results.  Either I just couldn't get them on my eye, they were uneven, or they just looked plain cheap.  Plus it seemed that I could never get them to fit my eye properly :(  SO I finally decided to invest in a nice pair and some good lash glue (instead of what comes with the lashes I had bought in the past because apparently this is a big no-no) and I'm actually pretty happy with the results.  

I learned a few things from some of the girls I work with (i.e. trimming the lashes to fit my eye, using tweezers or lash applicators to apply them, what kind of glue to buy, and to blow gently on the glue to dry it just a little before applying) and so this weekend I was adventurous and wore them to work and then out with some friends.  I was impressed because they did not budge all day and I got a lot of compliments on them.  To me, I felt like I looked like a doll, but most people said they looked pretty natural!  To try them out, I went with a naked eye (I didn't even put mascara on the bottom lashes) and a dark lip - still so in love with MAC Media lipstick!  What do you guys think?


I used the new line of Sephora Faux Lashes in a style called "Celebrity" because they looked like they gave good length and volume without being too heavy, plus they had an invisible band so I could do any look with or without liner.  It took me less time to apply these lashes than it normally does to apply my mascara!


The lashes didn't move at all during the day or my night out until midnight!  Had them on from about 8 a.m.!  First I combed and curled my natural lashes.  I used Duo Lash Glue (blue) and applied them with tweezers.  My nose always seems to get in the way, so I applied them on the center of my lid first and then used my fingers and the tweezers to push the lashes onto my lid on the corners.  After the glue was completely dry, i used black liquid liner to fill in any spaces between my lashes and the faux ones and then curled all the lashes together and applied a very thin layer of mascara to keep with the more natural look :)


I was so happy with how they turned out and lasted (once I got used to them), that I went online and ordered some from House of Lashes that I've been debating over for quite some time.  I picked up a style called Siren and one called Temptress that I've heard a lot about from many MUA'S on IG.  Their comapny has some amazing looking lashes, but for now, I think I'll stick to the more natural looking ones...maybe later I'll get a little crazy for you guys ;)  I think I may now be addicted to fake lashes...stay tuned to find out!  Stay beautiful my loves.

Make-Up, not War,

Rain xoxo


Wednesday, 4 September 2013

First Fall Look of the Season

I know I might be jumping the gun a little, but the weather today really inspired me to do my first Fall look of the season!  I did a bit of a makeup/wardrobe shop yesterday and got some great stuff to prep me for the upcoming cooler weather!  I have to say that I am a summer girl through and through, but I do love how cooler temperatures keep my makeup from running all over the place!  

My first stop was MAC where I picked up a lipstick called Media (check out the pics below) and I am just soooo in love.  It is an amazing deep wine that I think will probably be my go-to colour for the next few months.  I also picked up Lustre Drops in Pink from MAC as well.  Never tried them before, but I'm going to see if I can get the glossy eye look using them.  If not, they look gorgeous just on the cheeks :)  Next I stopped at Sephora and got me some plum lip liner from the Sephora Collection to go underneath my new lipstick, a pretty shimmery blue eyeshadow called Surfin U.S.A., and a gorgeous eyeshadow from the Kat Von D line called Shade Shifter - On the Road that I think compliments Media quite well.  I had to stop at Urban Planet to pick up a cheap maxi skirt for fall in a pretty plum colour.  It only cost me $10 and it has a nice slit on the left side that I love...looking forward to wearing it with some biker boots!

Anyways, the look I did this morning was in preparation for Fall and I'm pretty happy with it!  I used a lot of the products I grabbed yesterday, and I will continue to experiment! (please ignore my flyaway hairs that get in the way of the closeup picture on the bottom right...it's not a line through my makeup haha)


Face: Benefit Stay All Day Primer, Lancome Teint Idole Ultra, Laura Mercier Setting Powder, NARS Laguna Bronzer, NARS Orgasm Blush, e.l.f. Baked Highlight, MAC Lustre Drops in Pink

Eyes: Anastasia Beverly Hills Brow Powder Duo - Medium Brown, Urban Decay Primer Potion, NYX Jumbo Eyshadow Pencil - Milk, Kat Von D Shade Shifter Eyeshadow - On the Road (crease blended up), Kat Von D Eyeshadow - Orbi & Dimebag mixed (deep crease), Sephora Collection Colorful Eyeshadow - Surfin U.S.A. (lid), Kat Von D Eyeshadow - Lucifer (outer corner), Urban Decay Eyeshadow - Half Baked (center lid, applied wet), Laura Mercier Eyeshadow - Buttercream (highlight), Stile Smide Stick - Moray (lower waterline), Urban Decay 24 Hr Eyeliner - Smog (upper lid), Marc Jacobd Highliner - Blackquer (tightline), Diorshow Maximizer & Iconic Overcurl Mascara (lashes)

Lips: BITE Lip Primer, Benefit Fake Up Concealer - 02, Sephora Lip Liner - Plum, MAC Lipstick - Media  

I've been trying to edit and filter my pictures less, but it's tough when I don't always have the greatest lighting!  I can't wait until I can get my new camera and never have to worry about it again!  Possibly in 2 months? *crosses fingers*  Let me know what you guys thought of this look and any suggestions, questions, or requests are always welcome :)  Stay beautiful!


Make-Up, not War,

Rain xoxo

Tuesday, 3 September 2013

New Toys!

When you work in the industry and just love what you do, you tend to run into people that share your passion for makeup and beauty.  One of my dear friends works at a MAC in Vancouver and every once in a while we send each other "Beauty Care Packages" with new products we want each other to try, or just things we think would look great on the other!  Last time, I sent her some fragrance, a few skin-care goodies, lip tar, and a new pencil eyeliner for her to try.  She sent me the MAC Lip Conditioner, which I have used before and LOVE, and a totally gorgeous blue shadow called Contrast.  I of course had to do a quick look with it to show her how much I loved it and this is what I came up with!  This was probably the fastest look I've done in a long time, but I like it!  I might have to spend a bit more time on it in the future to perfect it...it kind of turned into a bit of a cut crease!


Products used: MAC Eyeshadow in Contrast, NYX  For Your Eyes Only Palette in Supermodel, Stila Stay All Day Liner in Sky Blue (limited edition), Sephora Long Lasting 12 Hr Wear Eyeliner in Fancy BlueDiorshow Artpen, Marc Jacobs Highliner BlackquerBuxom Full Bodied Lipstick Provocateur, Nars Laguna Bronzer, Milani Blush Rose D'Oro, Benefit Sun Beam, and Too Faced Mascara Better Than Sex

My conclusion after playing with the goodies my PENcil liner Pal sent me is that I need to buy more MAC pigments!  The shadow is actually quite sparkly and I am totally in love...I wish it showed in the pictures better :(  In other news, I have started saving for a nice CANON camera to take makeup pictures with!  No more being frustrated with bad lighting!  Yay!  Comment below if you have any suggestions, requests, or questions.  Stay beautiful!

Make-Up, not War,

Rain xoxo


Thursday, 29 August 2013

Inspiration for Looks

Though I do love creating my own personal looks, sometimes it's fun to try to re-create looks from other makeup artists.  I like doing this for a number of reasons.  First, I get to see how my skills measure up to other artists and second, I just get to challenge myself!  I almost always add my own flare to a look I recreate (whether it's because I want to, or because I made a mistake and just roll with it :p) because it adds a bit of my own personality.  As you know, I've been sick lately and yesterday I found out that it's pneumonia :(  It's not really that bad, it's just persistent and annoying for sleeping because it gets difficult to breathe when I lay down.  In spite of all that though, I still want to practice my artistry and create looks for you guys!  It actually helps me to focus on something other than my sickness and...well, who doesn't likw feeling pretty at any hour?!

I know I said that next up would be a foundation pictorial, but by the time I got home last night, there was no natural light left (as you'll see by the lighting in the pictures I took of last night's makeup).  I want to make sure I have the best lighting for a foundation tutorial so you can all see exactly what I'm doing and exactly how it looks in the end!  I might be able to do it tomorrow evening and post on Saturday, but if not it will get done Sunday and posted Monday :)  Last night's look was inspired by a fabulous makeup artist who calls herself sugarpants on Instagram.  She is totally beautiful and extremely talented.  I modified her look just a bit, but you can see the original here.


In sugarpants' look, I'm pretty sure she used a soft lavender eyeshadow on the lid with her black liner over top (she also used faux lashes, which I did not).  I am still perfecting my cat-eye liner, but hers is absolutely flawless.  One day I'll get there beauties, and when I do, I'll show you how!


Instead of the soft lavender that sugarpants used, I pulled out my Stila Stay All Day Liquid Liner felt-tipped pen in Sky Blue and lined my lid with this first.  I made the line much thicker than I normally would because I then went over the lower portion with my Bobbi Brown Black Gel Liner.


Unlike my inspiration's look, I brought the black liner down onto my lower lashline and over about halfway.  I tightlined my upper lashes and lined my full lower lid with Marc Jacobs Gel Highliner in Blackquer (which I LOVE btw, and though it's called "gel" it is a pencil liner with an AMAZING texture) and then came my Diorshow Maximizer and Diorshow Iconic Overcurl Mascara.  I also dabbed a wee bit of iridescent powder with a blue colour on the corners of my eyes, but you can't see it very well :(  Lighting is everything guys!


For the lips, I didn't have quite the right vampy purple-ish red, so I mixed my Mac Rebel Lipstick and a deep red colour I had laying around from Avon (I'm not sure what the colour is).  It's not quite what I was hoping to get, but I like it anyways!  The colour I REALLY wanted would have been Urban Decay's Revolution Lipstick in Shame, but this works too!  And it's my first lip concoction :)


I like this look a lot because the blue adds a brightening aspect to the eyes while still being sexy with the black eyeliner and deep lipstick.  This will probably be something I rock in early fall!  Join me? ;)


This look was fairly easy to accomplish and can be modified easily as well.  So if you want to use pencil liner or liquid, you definitely could!  I could also see this looking nice with VVS Lipsynch or another pale lavender lipstick or a pale pink!  If you have any questions about this look or anything you want to see me do, PLEASE let me know in the comments section and I will do my best to make aaallll your wishes come true!  Stay beautiful <3

Mak-Up, not War,

Rain xoxo

Wednesday, 28 August 2013

Socialite

I told you last night that I'd have a look done with Coloured Rain 's Socialite lipstick!  I couldn't be happier with this GORGEOUS nude!  It is a true nude and very pale, so if you're not used to a pale pout, this might also take some getting used to. I personally love the look of a dark, smoky eye and a nude lip, so this really compliments my go-to makeup style, especially for going out.

I decided to go with a deep purple smoky eye to pair with Socialite, but any smoked out look would work (I also thought about doing a green smoky eye, but it didn't match my outfit :p ...maybe next time!).  Socialite also works perfectly as a base for creating your own lip concoction and I will definitely be doing that soon!  I might actually mix Socialte and VVS Lipsynch to get an even paler Lavender, which I think would be gorgeous!  Here is how it turned out!


My collage look as per usual ;)  One of these days I will start using fake lashes in my looks.  The only thing I worry about is that fake lashes really do amp up ANY look, but I know that if I start to use them regularly, I will not be able to stop!  I am blessed with quite curly lashes, so I try to make due :)


The overall look I am really happy with!  I think this is a great going-out or date-night look and I only used 3 eyeshadow colours!  So it didn't take me long at all :)


Before using any shadow, I applied my Urban Decay Primer Potion.  I then applied a deep purple in the crease and blended up toward the brow bone.  I enhanced the crease by applying a matte black directly into the crease and outer corner.  Then I applied a brighter purple to the lid.  On the lower lashline I used Tarina Tarantino purple pencil liner, and to finish off I applied my Diorshow Maximizer and Diroshow Iconic Overcurl Mascara.


I just loooove how a good nude can make your pout look, well...pouty!  I still recommend priming, perfecting, and lining, even with a nude lip colour.  I used my Bite Lip Primer, Benefit's Fake-Up Concealer no. 2, and a clear lip liner before applying Socialite.  When my full face was finished, I used Urban Decay's De-Slick Spray to set my makeup.


I'm actually torn because I might like Socialite better than the Sephora nude I had recommended before in my previous post on My Favourite Products!  I will have a verdict by the end of the day once I see how it wears, but if the other colours I own from Coloured Raine are any indication, I'm going to be very happy!  I will fill you all in!  Please don't forget to comment with any questions or looks you'd like to see!  Next up: a pictorial on how to apply your foundation with a brush vs. a sponge!  Stay tuned, lovelies!


Make-up, not War,

Rain xoxo

Tuesday, 27 August 2013

Crazy Colour

In my previous post called, "Retro Glamour," I talked about finding the right red lipstick for your colouring and preferences.  I also talked about how it takes some practice to get used to wearing bright colours on your lips; that was no lie.  I've had tons of practice over the past year (since I really started to get into makeup as artistry) and I can tell you that I am now totally obsessed with the craziest colours for lipsticks.  I even go out of my way to try on the newest colours and I wear them in public on a regular basis; I LOVE IT!  

I know it can really be hard to get used to, but once you do it really opens you up to a world of colour and makes your more willing to try other things too!  You really can pull off all those things you think you can't...you've just gotta give it a try!  I started by just wearing the colours around the house to get used to seeing myself with a crazy lip, then I wore them in front of family and close friends to see how it felt, and then just full bore out in public and I haven't turned back since!

My new favourite lipstick is by a lovely woman that calls her line Coloured Raine.  It is very fitting because everything in it just creams amazing colour!  Some of the colours are a little out there for me to wear in public, but I would LOVE to do some inspired looks with them!  Right now, I have 4 of her colours: Lipnotize, VVS Lipsynch, Socialite, and Candy Girl (temp. out of stock).  I really honestly want them all!  They are so pigmented and true-to-colour and all of them are matte - my fave!  If you want to try a new lipstick line OR if you want to try out a new colour, this is where you want to look.  

I just received my order of VVS Lipsynch and Socialite in the mail yesterday, so I decided to do a look...I just couldn't resist.  Since I don't own a colour like VVS, I chose that one first, but don't worry!  Socialite will get an equally awesome look soon :)  Take a boo at how it turned out...call this one Lucky Lavender!


Even though this is very obviously not a natural lip colour, I am still just so mesmerized by it.  In my opinion, it's still classy while also being sexy and a little out-there.  I just did a simple gold and brown soft smoky eye to pair it with.


For the eyes I used Urban Decay's Naked Palette, Sephora Brown and Gold Liquid Liners, Urban Decay Smog Pencil Liner, Anastasia Beverly Hills Brow Powder Duo in Medium Brown, Diorshow Maximizer, and Diorshow Iconic Overcurl Mascara. (I love the way brown and gold and purple go together, so I just went with something simple)


I used Bite Lip primer to prep and prime my lips, I then perfected the lip line with Benefit's Fake-Up Concealer no. 2, lined the lips with a clear lip liner, and went to town with VVS Lipsynch!  I topped it off with a little Buxom Gloss called Princess (a really pretty, iridescent, pink-ish purple) and I love that it gave a little shine to my pout!  Though I am still a matte girl through-and-through!


I am really happy with the way this looked turned out and I would definitely wear it out.  I honestly think most people could pull this look off too!  Great for a night on the town :)

Please feel free to comment on this look and let me know if there is anything you would like to see!  I love experimenting, so challenge me ;) If you have any questions, leave it in the comments section and I will always answer!  Stay beautiful, lovelies!

Make-Up, not War,

Rain xoxo


Friday, 23 August 2013

Retro Glamour


In this look, I used Anastasia Beverly Hills Brow Powder Duo in Medium Brown, Bobbi Brown Gel Liner, Dior Iconic Overcurl Mascara, and Makeup Forever Mat 8 Lipstick.  I like the clean look, but if you bring the liner down onto the lower lash line and add some mascara on the lower lashes, you get a sexier, more intense look. - check out the pic below!


Same lipstick, liner and mascara, but used a darker brow powder and brought down the liner onto the lower lashes.  Also used a filter because the lighting was bad!  See my previous post on lighting !

One of the easiest ways to do a fast, but glamorous look is to go with the classics: cat-eye liner and a red lip.  This look is simple, fast, and almost anyone can pull it off.  It screams old Hollywood and it is personally one of my favourite go-to looks.  A lot of people think they can't pull of red lipstick, but pretty much everyone can, you just have to find the right red.  There are maroon reds, blue-reds, orange-reds, and pink-reds...finding the right one for your skin tone is essential.  I personally like the blue-reds because they make your teeth look whiter and they are usually a deeper, truer red.  Maroons are also beautiful and a deep wine colour looks great on EVERYONE, and I mean EVERYONE.

I find that the biggest obstacle for wearing red lipstick for most people is that they are just not used to seeing their face with a bright lip like that.  Wearing an intense colour on your lips actually shifts the focus of your face and so many people are just unsettled by the sight...keep wearing it!  It gets better the more you wear it because you get used to it.  Another tip is to try a matte red instead of a high gloss to start out.  Matte's stay put and they are also just less shocking than something shiny or glossy; it'll be easier to get used to.  I NEVER used to wear anything but nudes and nude-pinks, but then I tried a red and just kept doing it...now I love bright and unique colours and rock them whenever I can!

A lot of people seem to have trouble with the winged liner as well, and with good reason!  It can definitely be hard to get the hang of.  Most people go for a liquid liner, which can look beautiful, but is often hard to control because the formula is liquid and can be runny.  For beginners, I honestly recommend investing in a gel liner and a good brush.  You get a much more precise application and the formula stays where you put it, plus you can experiment with different shapes!  I also like that most gel liners dry matte instead of high-gloss like liquid liners.  Just my personal preference though!  My favourite gel liner is Bobbi Brown and the brush from that line is also a must...the shape allows for much more freedom in your application.  If you're set on a liquid liner though, I really like the Sephora Collection Longwear Liquid Liner or the Stila Stay All Day Liner, which comes in a pen style applicator (the Dior Artpen is also really great).  Just play around!  You'll find the product, shape, and colours that work best for you....promise!

Make-Up, not War,

Rain xoxo

Wednesday, 21 August 2013

Experimenting: Cut Crease

As an aspiring makeup artist, I do my best to push myself out of my comfort zone when it comes to looks.  I try to attempt new techniques so I can expand my skills.  It seems that every time I try something I've never done before, another new technique pops up...which is so exciting to me!  I don't think any makeup artist claims to be a master of every technique or every look, but I think what makes for a true artist is the willingness to learn and try new things...and that's not just with makeup!  Even though sometimes our art might not turn out the way we had hoped, it gives us an opportunity to grow and develop and PRACTICE!  Which is so important.  If you get too comfortable doing something, I think that is when you start to lose interest or when you stop trying to better yourself.

Last night was my first attempt at a "cut crease" look.  I am not unhappy with the results perse, but the crease didn't end up as "cut" as I would like.  I think part of the problem was that I didn't have the right tools, but of course I had never done it before, so I am bound to make mistakes!  I did like the end result as long as you don't look too closely :p  All in all, I would do this look again and I plan to perfect it until I get the results I want!  Maybe I won't do this particular colour scheme again, but I really love the cut crease look and I want to add it to my skill arsenal as a makeup artist!


I'm sure by now you've all figured out that I love collages of looks.  I think it just gives a better overall feel of the look when you can see it all at once, including all the closeups.


For this look, I applied my foundation, concealer, brows, highlight, blush, and bronzer as usual, except I used a paler lavender-pink blush to compliment my colour choices.


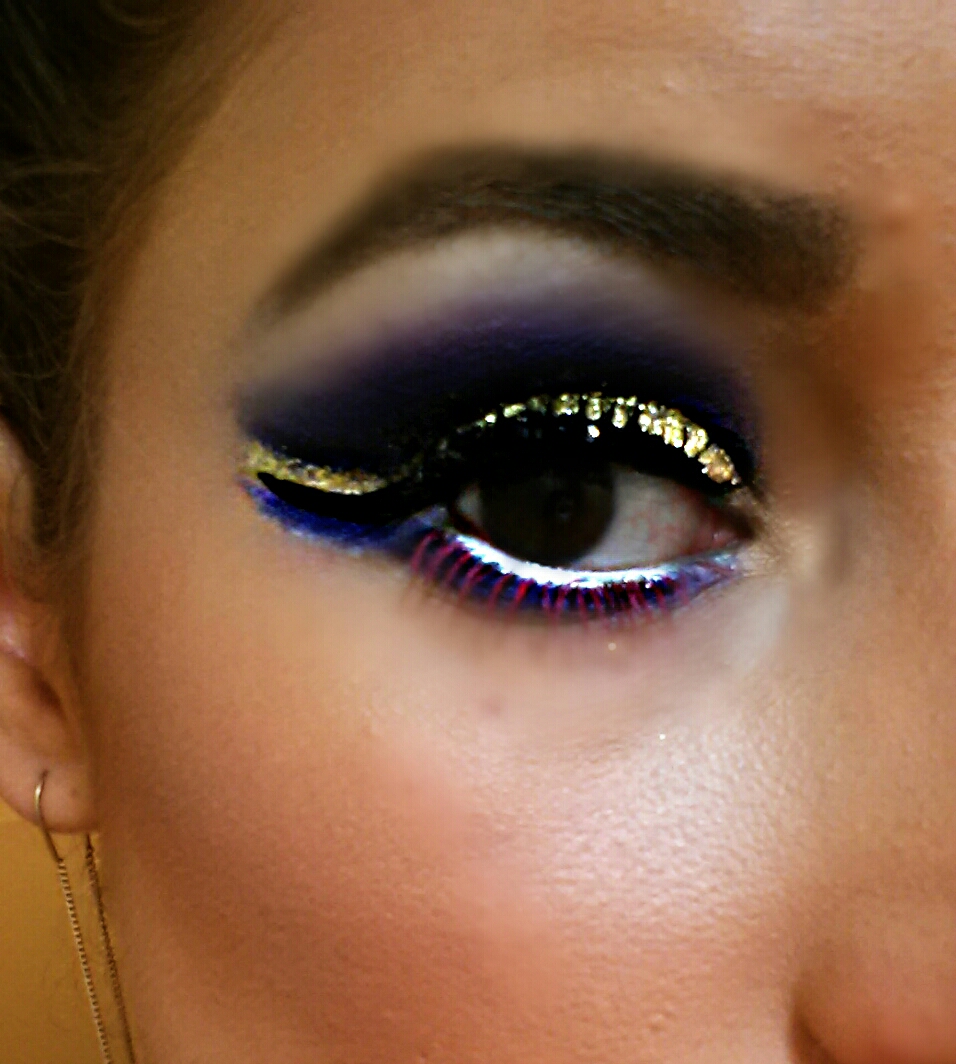
Since I had never attempted a cut crease before, I decided to see if I could do it without any sort of instruction.  First I applied eyeshadow primer, then the NYX Jumbo Eyeshadow Pencil in Milk as a base, and then I cut my crease with Tarina Tarantino Purple Pencil Eyeliner (discontinued), but any longwear purple eyeliner would do.

Next I started to fill in a dark purple shadow from the drawn crease upward.  I used "Purple Rain" from the Sephora Collection Colorful Eyeshadow line.  I then blended the purple out with a medium grey to add depth and highlighted under my brow and in my tear duct with a shimmery nude.  


Next came the tricky part.  I realized I didn't have any proper glitter adhesive, so I used a glitter liner to fill in my lid and sweep out from my outer corner.  While it was still wet, I applied NYX loose gold glitter so it would stay.  I seem to have misplaced the brush I usually use to apply glitter, so I used the tip of my pinky finger (I think this is why my crease did not end up as "cut" as I would have liked.  After the glitter dried, I used the Dior Art Pen in Black to draw the upper lid liner.  I tightlined my upper lashes with black pencil and rimmed my lower lid with the NYX Milk Pencil. (See how the crease isn't "cut"?  One day soon it will be!)


Following the line I had made with NYX Milk, I used the same purple eyeshadow used on my lid to colour my lower lashline; I took it out passed the end of the black liquid liner.  I then lined my lower waterline with the NYX Milk Pencil to make my eyes look a smidge bigger.  Next came mascara!  I use the Diorshow Maximizer as a base and the Diorshow Iconic Overcurl on top.  I used the Diorshow Maximizer on my bottom lashes as well and then the Anastasia Beverly Hills Hypercolor Brow and Last Tint "In the Pink" over top to really make the colour pop! (my camera is crappy so you can hardly see it, but in real life it looks really bright!)


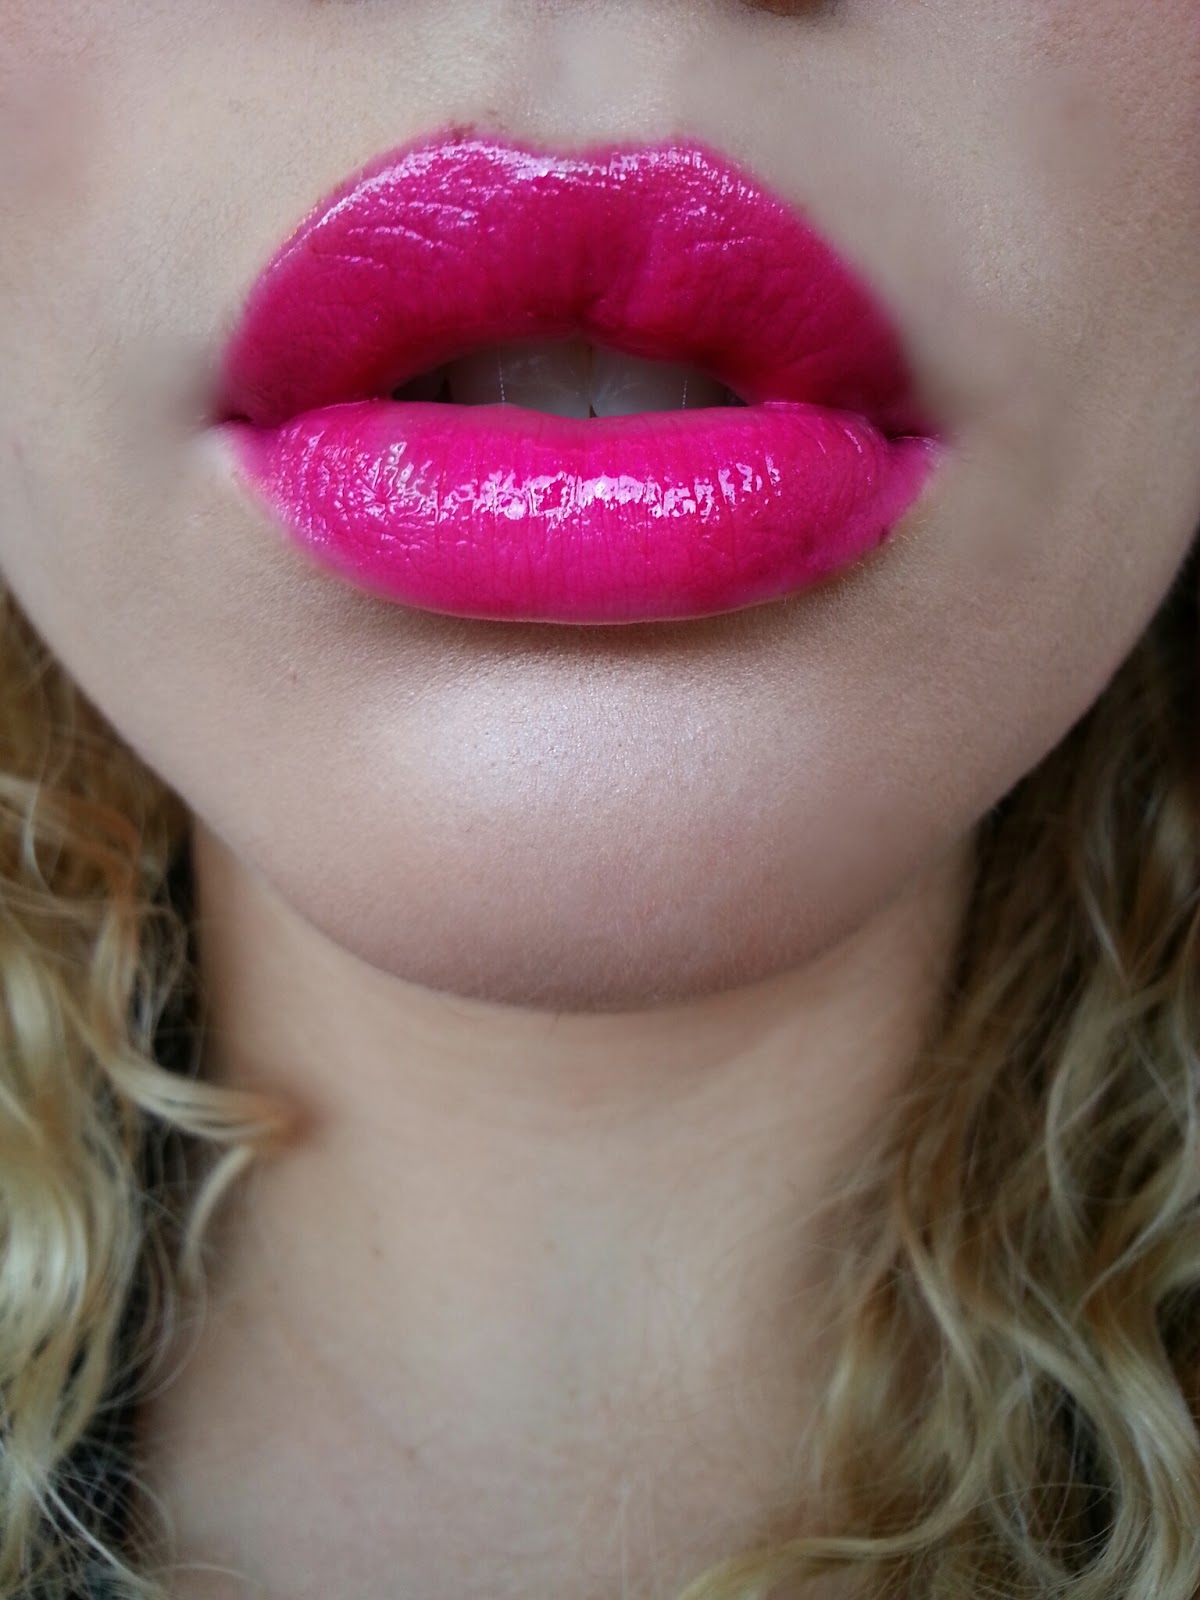
I used Sephora Rouge Shine No. 18 on the lips (after lining and priming of course!) and dabbed a little electric pink shadow from the Sleek Acid Palette over top to give it a bit more colour, since the Rouge Shine line is fairly sheer.  I could have also gone with MAC Rebel lipstick, a deep purple, but I decided the brighter the better!

Like I said before, practice makes perfect.  This being my first time with this kind of look, it is obviously not perfect!  I am quite happy with how it turned out considering my lack of experience with it, but stay tuned to see me perfect it!  I know this is not a "pictorial", but I will be doing those soon!  If there is anything you guys want to see particularly, please leave it in the comments section!  Alternately, if there are any specific looks you want me to do, please let me know!  Have a great day, my lovelies!

Make-Up, not War,

Rain xoxo


Saturday, 17 August 2013

When I'm bored...

Boredom is definitely a sign that you should do something productive, right?  Some people clean, some people work out, some people read...I go crazy with makeup!  Something about having so much focus on one thing is therapeutic and calming for me.  I guess makeup is art after all, so why wouldn't it be?  Some people think it's vain to put so much effort into one's face and to focus so much on the aesthetic, but this is something I really enjoy and I feel that I am getting much better at...so f*ck all the haters I say!  Here is my look created out of boredom last night!  I used Sleek Makeup's iDivine Sleek Acid Palette for the green, orange, and yellow on the eyes with NYX Jumbo Eyeshadow Pencil in Milk as a base and white highlight, Sephora Collection 14HR Electric Blue Liquid Liner, Anastasia Beverly Hills Hypercolor Brow and Lash Tint "In the Pink" for the brows, and Coloured Raine Lipnotize as the lighter pink and MAC Rebel as the purple for the ombre lippie!  This was my first attempt at a coloured brow AND an ombre lip...bear with me, I will get better!  I call this one Couture Clown ;)


Here is a 360 degree look at this blast of colour!  You can tell I had lots of fun with this one :)


Of course I would never wear this on a normal day, but for a concert or festival 
of some kind, I bet it would look rad.  I am in LOVE with the pigments!

**NOTE: iDivine has AMAZING products at great prices.  They are based out of the UK though, so some products don't ship to Canada.  The Sleek Acid Palette was one of those, but I found it on eBay.  Keep checking their website as they release new products shipped to Canada all the time! GET IT HERE

Make-Up, not War,

Rain xoxo


Friday, 16 August 2013

Here I am, Internet!

So I have finally decided to start a blog, ladies and gents!  I'll post all of my makeup looks here and start doing pictorials and, maybe someday, get the hang of doing makeup videos!  I'll also be posting on my favourite products, must-haves, industry news, and, of course, my makeup purchases!  Please let me know if there is anything you want to see me post about!  Also, please check out my INSTAGRAM for past looks and other fun stuff, but for now, here is a recent makeup look! ;)


Make-Up, not War,

Rain xoxo