Tuesday 1 October 2013

Halloween Test Drive #2

Well!  I'm back!  Sorry I haven't posted in so long, but I have been MUCHO sick and also pretty busy.  Had pneumonia a few weeks ago and then just picked up a nasty cold that I'm getting over, but I did manage to find the energy (and time!) last night to test out my Medusa makeup once again!  I got my contacts in the mail and applied some constructive criticism and suggestions to the look and I am REALLY pleased with how it turned out!  I still think it needs just a little tweaking before the big day and I will probably do it once more before Halloween, but I would not have regretted looking like this at a costume party :)


I used a different stocking than last time to achieve the snakeskin look with Kat Von D's Shadeshifter Shadow in On the Road.  Last time, the scales came out very diamond shaped, which was fine, but I think this looks more authentic.  I have an airbrush stencil coming in the mail, so I will be able to make it much more precise and bring the pattern down farther onto my forehead and connect it with my cheeks as well.  I used black gel liner for the overdrawn wing and pointed tear duct this time instead of pencil liner and shadow and the result is MUCH crisper and more intense.  I also used the gel liner to fill in and detail my brow (I made it a little hairy and crazy looking) covered with a waterproof mascara.  The contacts are just SICK in my opinion...they make the look!  I have seen contacts like this at Halloween stores and Spencer's, but they run around $40-$50, which is a little more than I want to pay for contacts for one-time use.  I did some searching online and found Coloured Contacts Hut, which had these contacts and SO many more for a much more reasonable price.  I think I paid around $20 for these?  Plus they have free worldwide shipping, which is rad.  The lips are a combo of black gel liner, Coloured Raine lipstick in Raunchy, Dior Shadow, and Too Faced Lip Injection Lip Gloss.  I have fangs for this look as well, but I wanted to catch the last of the natural light for the photographs (last time, the pics didn't come out so great), so I didn't have time to get them moulded :(  Let me know what you guys think of this look and please, please, PLEASE leave any suggestions or constructive criticism in the comments section...would love to hear from you :)  Stay Beautiful, lovelies!

Make-Up, not War,

Rain xoxo


Thursday 19 September 2013

Halloween Test Drive

I have decided that this year I will be going as Medusa for Halloween!  I already have curly hair, so all I have to do is at snakes and some sick makeup and I will be good to go!  Since the makeup for Medusa is pretty detailed and involved (at least the kind I want to do), I decided that I would do a couple test runs before the day, so that I can perfect it and make sure it is on point.  Two nights ago, I tried it out for the first time!  The lighting in my house is just absolute CRAP after dark, so please excuse the crappy quality.  It is unfortunate because there is SO much more green and even a little red to the look that you can't see at all :(  It needs to be tweaked a bit for sure, but I am pretty happy with my first go at this type of theatrical application :)


I am extremely happy with how the lips turned out, especially because I made a concoction all my own!  I used Bobbi Brown Gel Liner for the black around the outside of the lips, Stila Smudge Stick in Moray topped with Dior Olive eyeshadow for the green in the center, then went over the very middle of the lips with QUO Electric Eyes Green Pencil, and just used a clear gloss over top!  The eyes are a little more smudgey than I wanted them to be.  I was going for a smudged, almost dirty look, but in hindsight, I think using sharper lines will make it look much better.  I completely winged the eyes, so I am proud even though they need work :)  I used Celebrity lashes from Sephora for this look.  For the scales, I used a gold cream shadow base topped with gold shadow.  Then, I took a piece of fishnet stocking and used a sponge to dab Kat Von D Shadeshifter shadow in On the Road to get the pattern :)

I picked up some fangs at a local Halloween store, but not the whole mouth kind.  I bought the single, press-on ones so that I don't ruin my makeup and I will still be able to talk throughout the night :p  I also bought some awesome reptilian contacts online.  I can't wait for them to get here so I can take another shot at the Medusa makeup with the FULL look!!!  Check them out! 


I would love to hear what you all think of this look and especially if you have any suggestions on how this could be improved!  Leave any tidbits in the comments section and I will always reply! Stay beautiful (and mildly creepy) this Halloween!

Make-Up, not War,

Rain xoxo


Saturday 14 September 2013

Natural Makeup

Occasionally, I like to go more natural with my makeup...but only occasionally lol  I almost always have a full face of foundation on, but sometimes I opt for just mascara and a natural lip.  Now, whether that is because I run out of time doing my makeup in the morning, because I'm just too lazy, or because I actually decide to do it, is for me to know and you to find out ;)  Today I went on the more natural side with a cheeky blush application, natural lip balm, and mascara only on the top lashes with a liiiittle white eyeliner on my lower waterline.

I'm starting to get a little better with my brows, but you can see they're not QUITE even and a little misshapen at the ends...BUT I've come a long way and I'm happy with them :)  I think I need to invest in a brow pencil to sharpen them up a little bit, but that's for another day!  Let me know what you guys think of this natural, "no makeup" makeup look!  Stay beautiful, lovelies!

Make-Up, not War,

Rain xoxo


Thursday 12 September 2013

Contouring/Face Sculpting

So, I am trying to get a little more into face sculpting/contouring with cream products.  I picked up a contouring wheel from Lise Watier a couple of days ago and decided to test it out this morning.  Normally I just contour with powder products like my bronzer, blush, and highlight.  It works well for the darker applications I think, but for some reason powder highlight just doesn't do it for me...I don't get that bright, creamy look I always want.  This morning I spent a little extra time on my face applying product, but I am happy with the results.  I need a little more practice I think and I need to get a proper blending brush (right now I am using my Beauty Blender), but I got that sculpted look I was after.  However, I think the pictures turned out a little better than what I think it looks like in real life...in the mirror I almost feel like I just have dirty face?  Maybe it's just because I am not used to how sculpted it looks or maybe I need to blend a little more?  I will keep practicing and once I have it down, I'll do a pictorial!  I think it might be that I need to wet the Lise Watier cream before applying it because it is quite thick and I might need to dampen my sponge a little more for blending.  Overall though, I'm pretty satisfied with how it turned out :)


 When I picked up the contouring wheel from Shopper's Drugmart, I also picked up a Quo eye pencil in this gorgeous shimmery green...I just couldn't resist it!  Lise Watier also has a correcting wheel that comes with a lilac and a green portion, but I really wanted the dark colour for contouring.  I might pick up the correcting wheel another time though :)


I applied foundation first and concealed under my eyes and fixed any blemishes before I applied the highlight and contour with a concealer brush.  I then blended the products out and together with a damp Beauty Blender.  In hindsight, I think it needed to be just a liiiiittle more wet, but I still like the results :)  I've always loved that high, sculpted cheekbone look, but powder just wasn't giving me the results I wanted...with a little more practice, I think this just might become a staple in my routine!

I'd really love to hear feedback from you guys on how you think this turned out?  I'm not very impartial when it comes to my own face :p  Also would make me super happy to see comments on what you guys want to see or any questions you might have?  Let me know!  Stay beautiful <3

Make-Up, not War,

Rain xoxo
Wednesday 11 September 2013

Desperately Holding onto Summer

So I know that I did a Fall look a couple of posts back, but I am definitely going to miss all the bright colours of Spring and Summer :(  So, to celebrate the awesome Summer we've had, here's a bright and vibrant look!


Purple and vibrant pink look with Marc Jacobs Lip Lacquer in Boom Boom


This lip gloss is amazeballs.  It is SUPER pigmented and lasts for hours, which is surprising for a gloss, but it's not really sticky, which I love!


I used the "tape trick" to get the harsh line and I also used NYX Jumbo Eyeshadow Pencil - Milk to get the colour to really show through.  Eyeshadows are Sleek Acid Palette and Sephora Collection.


Just something quick and fun for you guys to check out.  I had a request on reddit to do a pictorial for this look, so when I do, I will post it here as well in case anyone is interested :)  Please leave a comment if you have anything to say, questions, or suggestions!  Love to hear from you :)

Make-Up, not War,

Rain xoxo

Tuesday 10 September 2013

Lashes, Lashes, Lashes

I have been debating trying false lashes for a long time now.  I have tried them before, but I've never really been happy with the results.  Either I just couldn't get them on my eye, they were uneven, or they just looked plain cheap.  Plus it seemed that I could never get them to fit my eye properly :(  SO I finally decided to invest in a nice pair and some good lash glue (instead of what comes with the lashes I had bought in the past because apparently this is a big no-no) and I'm actually pretty happy with the results.  

I learned a few things from some of the girls I work with (i.e. trimming the lashes to fit my eye, using tweezers or lash applicators to apply them, what kind of glue to buy, and to blow gently on the glue to dry it just a little before applying) and so this weekend I was adventurous and wore them to work and then out with some friends.  I was impressed because they did not budge all day and I got a lot of compliments on them.  To me, I felt like I looked like a doll, but most people said they looked pretty natural!  To try them out, I went with a naked eye (I didn't even put mascara on the bottom lashes) and a dark lip - still so in love with MAC Media lipstick!  What do you guys think?


I used the new line of Sephora Faux Lashes in a style called "Celebrity" because they looked like they gave good length and volume without being too heavy, plus they had an invisible band so I could do any look with or without liner.  It took me less time to apply these lashes than it normally does to apply my mascara!


The lashes didn't move at all during the day or my night out until midnight!  Had them on from about 8 a.m.!  First I combed and curled my natural lashes.  I used Duo Lash Glue (blue) and applied them with tweezers.  My nose always seems to get in the way, so I applied them on the center of my lid first and then used my fingers and the tweezers to push the lashes onto my lid on the corners.  After the glue was completely dry, i used black liquid liner to fill in any spaces between my lashes and the faux ones and then curled all the lashes together and applied a very thin layer of mascara to keep with the more natural look :)


I was so happy with how they turned out and lasted (once I got used to them), that I went online and ordered some from House of Lashes that I've been debating over for quite some time.  I picked up a style called Siren and one called Temptress that I've heard a lot about from many MUA'S on IG.  Their comapny has some amazing looking lashes, but for now, I think I'll stick to the more natural looking ones...maybe later I'll get a little crazy for you guys ;)  I think I may now be addicted to fake lashes...stay tuned to find out!  Stay beautiful my loves.

Make-Up, not War,

Rain xoxo


Wednesday 4 September 2013

First Fall Look of the Season

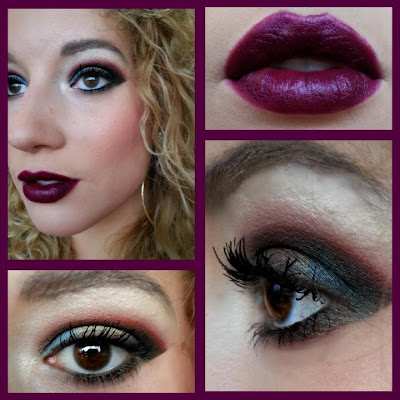
I know I might be jumping the gun a little, but the weather today really inspired me to do my first Fall look of the season!  I did a bit of a makeup/wardrobe shop yesterday and got some great stuff to prep me for the upcoming cooler weather!  I have to say that I am a summer girl through and through, but I do love how cooler temperatures keep my makeup from running all over the place!  

My first stop was MAC where I picked up a lipstick called Media (check out the pics below) and I am just soooo in love.  It is an amazing deep wine that I think will probably be my go-to colour for the next few months.  I also picked up Lustre Drops in Pink from MAC as well.  Never tried them before, but I'm going to see if I can get the glossy eye look using them.  If not, they look gorgeous just on the cheeks :)  Next I stopped at Sephora and got me some plum lip liner from the Sephora Collection to go underneath my new lipstick, a pretty shimmery blue eyeshadow called Surfin U.S.A., and a gorgeous eyeshadow from the Kat Von D line called Shade Shifter - On the Road that I think compliments Media quite well.  I had to stop at Urban Planet to pick up a cheap maxi skirt for fall in a pretty plum colour.  It only cost me $10 and it has a nice slit on the left side that I love...looking forward to wearing it with some biker boots!

Anyways, the look I did this morning was in preparation for Fall and I'm pretty happy with it!  I used a lot of the products I grabbed yesterday, and I will continue to experiment! (please ignore my flyaway hairs that get in the way of the closeup picture on the bottom right...it's not a line through my makeup haha)


Face: Benefit Stay All Day Primer, Lancome Teint Idole Ultra, Laura Mercier Setting Powder, NARS Laguna Bronzer, NARS Orgasm Blush, e.l.f. Baked Highlight, MAC Lustre Drops in Pink

Eyes: Anastasia Beverly Hills Brow Powder Duo - Medium Brown, Urban Decay Primer Potion, NYX Jumbo Eyshadow Pencil - Milk, Kat Von D Shade Shifter Eyeshadow - On the Road (crease blended up), Kat Von D Eyeshadow - Orbi & Dimebag mixed (deep crease), Sephora Collection Colorful Eyeshadow - Surfin U.S.A. (lid), Kat Von D Eyeshadow - Lucifer (outer corner), Urban Decay Eyeshadow - Half Baked (center lid, applied wet), Laura Mercier Eyeshadow - Buttercream (highlight), Stile Smide Stick - Moray (lower waterline), Urban Decay 24 Hr Eyeliner - Smog (upper lid), Marc Jacobd Highliner - Blackquer (tightline), Diorshow Maximizer & Iconic Overcurl Mascara (lashes)

Lips: BITE Lip Primer, Benefit Fake Up Concealer - 02, Sephora Lip Liner - Plum, MAC Lipstick - Media  

I've been trying to edit and filter my pictures less, but it's tough when I don't always have the greatest lighting!  I can't wait until I can get my new camera and never have to worry about it again!  Possibly in 2 months? *crosses fingers*  Let me know what you guys thought of this look and any suggestions, questions, or requests are always welcome :)  Stay beautiful!


Make-Up, not War,

Rain xoxo